Planning a Peula
Navigate the Peula editor
Find the plan controls, collaboration signals, and the actions that are always available while you work.
At a glance
- 1Use the top bar to return to the dashboard, rename the Peula, undo or redo a change, and format selected text.
- 2The action row beneath it is responsive: on a smaller screen, actions that do not fit move into the More menu instead of disappearing.
- 3Check the save indicator at the right before leaving. It tells you whether changes are saving, saved, or need attention; select it to save now when that option is available.
- 4The avatars beside the save state show people currently present in this Peula. Their work is shared live, so avoid overwriting a section someone else is actively editing.
- 5If your shevet uses them, the Points and Budget pills show the plan's current totals. They are summaries, not submission controls.
- 6The status pill and its actions sit at the start of the second row. Use that area for Draft, Submitted, Needs work, and Approved—not the Share button.
Step-by-step walkthrough
1.Get to know the editor
The editor is where a Peula is written. The top two rows hold every control; the rest of the page is the plan itself, built from activity blocks.
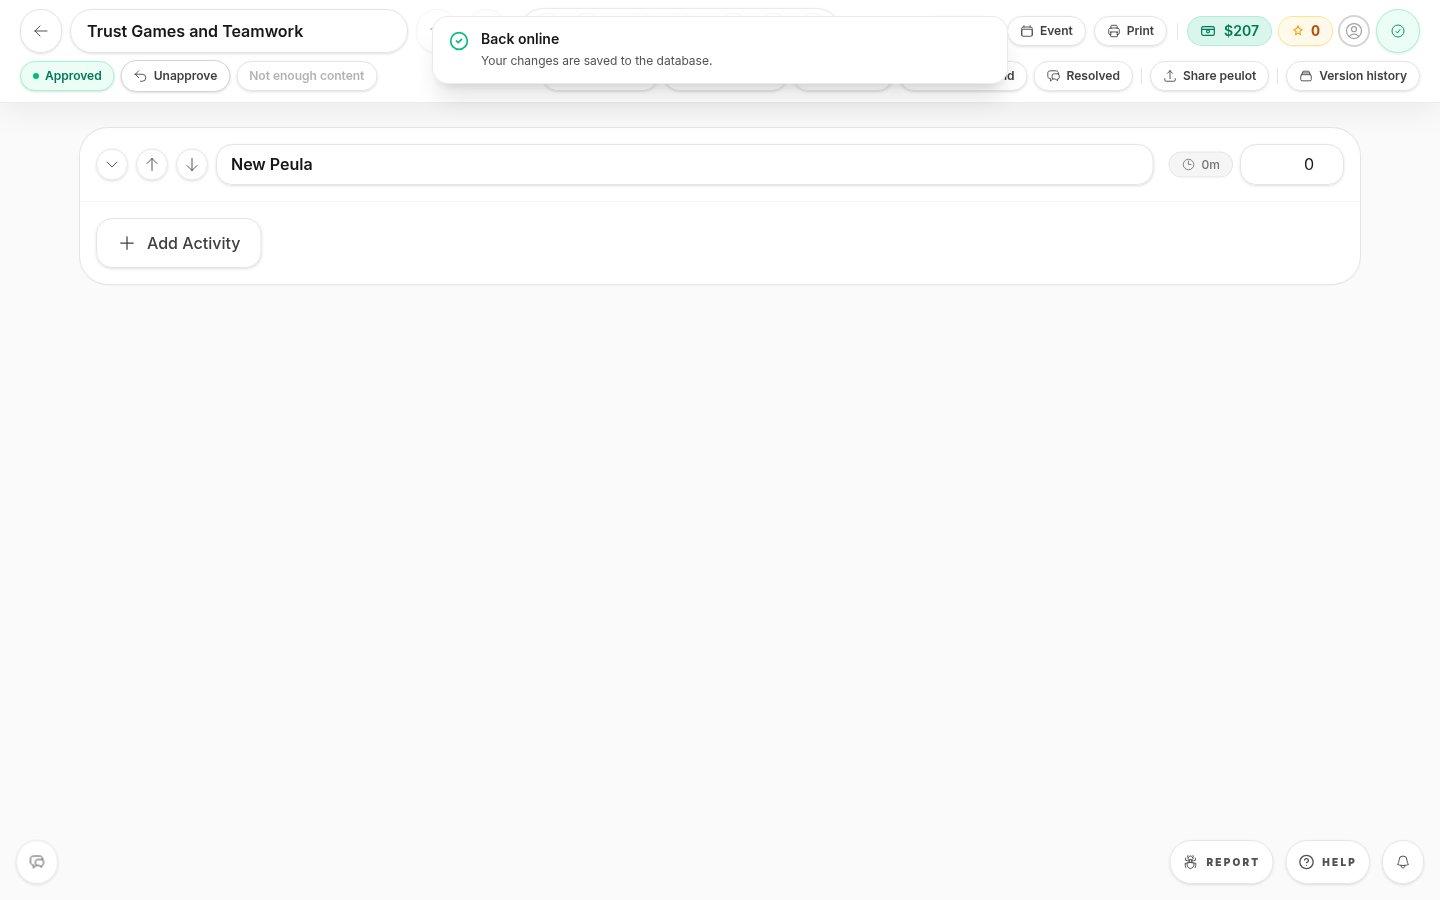
- Back and titleThe arrow returns to the dashboard. Select the title to rename the Peula. Undo, redo and text formatting sit beside it.
- StatusThe pill shows where the Peula is in review: Draft, Submitted, Needs work or Approved. The buttons next to it submit, approve or send it back, depending on your tafkid.
- Tools rowEldar Junior (AI help), the Peulot library, Materials, Request Tzuid, Resolved comments, Share peulot across shevatim and Version history. On a small screen some move into More.
- Share, Event and PrintShare invites people to edit or view. Event links the Peula to a calendar date. Print opens a printable copy.
- Budget and pointsThe money pill shows the tzevet budget still available after this plan's costs; the star pill shows its points. They are summaries, not controls.
- Activity blockEach block is one part of the Peula with a title and length in minutes. Use the arrows to reorder blocks and Add Activity to add the next one.
2.Work in the editor safely
- 1Rename the Peula from the title box at the top left.
- 2Add an activity block for each part of the plan and set how many minutes it takes.
- 3Watch the save indicator at the top right before you leave: it shows whether changes are saving, saved or need attention.
- 4Avatars at the top right show who else is editing now. Changes appear live, so avoid editing the same block at the same time.
- 5When the plan is ready, use the status buttons to submit it for review instead of the Share button.
Tip: Use Version history to see or restore an earlier version if something was changed by mistake.
Where to look
Top bar
Across the top of the editor
Action row / More
Below the top bar
Save and presence
Right side of the top bar
Status
Start of the action row